
Another step with my Z80 based computer. Yesterday I played with sprites. As I’ve got a Commodore 16 in my childhood, I never had any experience with sprites, apart whose I saw at home of a couple of friends of mine that had C64 and MSX computers. So I was very intrigued to try those “ethereal” objects. Keep in mind that they were one of the reasons I chose to implement a TMS9918A in my home-brew computer.
So, what is a sprite? In IT, a sprite is a graphical object that can be moved around the screen with minimal involvement of the programmer since in computers & consoles of the ’80s the job of moving the sprites was carried out by the video chip itself. A sprite isn’t a simple shape moved over the background: in fact, to move a shape you have to save the pixels of the place where you think to position the shape, place it and redraw the pixels that the shape has freed in its movement. Instead, a sprite is like a layer that the video chip overlaps to the rendered image before to send it to the output circuit that generates the video signal. With just a couple of bytes, that indicate the vertical and horizontal position of the sprite, this object can be moved around the screen easily. This kind of objects are known as hardware sprites, to indicate that they are handled directly by some specific hardware.
The TMS9918A has 32 hardware sprites that can be placed anywhere on the screen. However, they have some limitations:
- their size can be only 8×8 or 16×16 pixels: the latter are simply 4 adjacent sprites that are moved as a single entity;
- they can be only monochromatic (just 1 color);
- there can not be more that 4 sprites per single video line: the fifth (and over) sprite is made transparent;
- there is only a single bit for sprite collisions that is set to indicate that at least two sprites are overlapping themselves, but you don’t have any indication about which sprites are colliding.
Despite these limits, the TMS9918A has some interesting features: it can use a single pattern for more than one sprite. What does it mean? It means that as soon as you entered into the memory the bits that compose the pixel shape, the system assigns a number to that object and you can use such number to replicate its pattern for as many objects as you want. You can magnify the sprites, doubling their pixels, by setting a single bit of the VDP: so, a 8×8 pixels sprites enlarges to 16×16 pixels, and a 16×16 sprites to 32×32 pixels. There is a fifth sprite bit that is set when 5 or more sprites are on the same video line, so that the code can check which sprites are together and alternate them so that no more than 4 sprites are shown. This is called the “sprite flickering” and it was widely used in the past on several computers and consoles to let that a lot of sprites could freely move around the screen. The disadvantage of this technique was the flickering of the objects when the game turned the sprites on and off alternatively.
Now that we have seen pros and cons of the sprites on the TMS9918A, let’s examine a concrete example on how to handle these objects. First of all, we have to set the TMS9918A in any of the graphics mode other than the text mode since this is the only one that doesn’t permit to handle any graphics feature of the VDP, including the sprites. I did these tests by BASIC since I had to get carried away with this new thing (at least for me) so I didn’t want to burn 50 times my EEPROM to correct my errors… I chose to set the TMS9918A in graphics mode 1, and to get this I simply sent the following settings to the VDP registers:
- reg. 0: $00 -> this sets the VDP to disable the external video input
- reg. 1: $C0 -> this sets the VDP to Graphics 1 mode, disables interrupts, sets 16KB of VRAM, sprites are 8×8 pixels and there is no sprite magnification
- reg. 2: $06 -> name table address (the part of memory that acts as the video buffer for chars that are on the screen) set to $1800
- reg. 3: $80 -> color table address (the part of memory that stores the informations of the colors of the patterns displayed on the screen) set to $2000
- reg. 4: $00 -> pattern table address (the part of memory that stores the patterns of the chars displayed on the screen) set to $0000
- reg. 5: $36 -> sprite attribute table (the part of memory that keeps that infos about the sprites, like V & H coordinates) set to $1B00
- reg. 6: $07 -> sprite pattern table (the part of memory that stores the bits that form the sprite shapes) set to $3800
- reg. 7: $05 -> background color set to light blue
After this settings, I copied the char patterns that I set up for the first tests into the pattern table so that I could visualize some characters on the screen. Then, I created a simple shape for a 8×8 pixel sprite: a smiling face in black color. The result is this one:
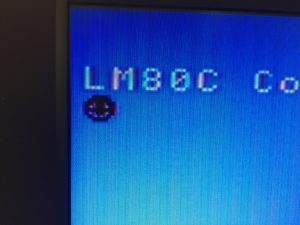
LM80C – text and sprite
Now I replicated the face 31 times with different colors. This is very easy because the sprite attribute table keeps track of the active sprites and handle them with just 4 bytes. In order, they represent:
- the vertical coordinate (from 0 to 191)
- the horizontal coordinate (from 0 to 255)
- the number of the pattern to use (from 0 to 31): the pattern is loaded by the sprite pattern table where the sprites are stored in numerical order starting by 0. For 8×8 sprites, each pattern gets 8 bytes, for 16×16 sprites each pattern gets 32 bytes (8 bytes for each of the 4 single sprites that form the biggest one)
- the color (from 0, transparent, to 15, white)
I wrote a simple program that place the sprites to form a kind of stairway and then I moved them from left ro right and backwards. You can notice the speed of the animation: very horrible! This was the limit of the interpreted languages on the 8-bits computers where a program stored in RAM had to be read, that each of the statements decoded and interpreted, and the executed. I promised to myself to write the same code using assembly language and look for the difference in therms of speed… At the moment, look at this simple test:
The firmware and the BASIC code will be available online on my Github repository soon.