
 When we’re setting up a program that will interact with the user, we should consider the case that the user could “distract himself” and didn’t terminate the required operation within a certain time. This can happen, i.e., when our project uses a serial communication or an I/O interface with a keyboard and an LCD display between the user and the Arduino. Let’s do an example: at a certain moment, the user is required to insert a number/text or to make a choice in the UI (user interface). But, what does it happen if the user leaves the device and doen’t terminate the operation? The request will remain unfinished, pending, waiting for an input. And what can happen if our device is accessible by anyone? Let’s think about a circuit with an LCD display and a keyboard that has the control of something we’ve built. Generally, this kind of project has a menu with which the admin can configure the circuit itself without the need to program the microcontroller everytime a variation of the parameters is required. Usually the access at the admin menu is protected by a password to avoid that normal users can alter the behaviour of the device. Now, let’s imagine that the admin leaves the device without closing the admin menu? The first person that access the device can alter the whole device! So, it’s a good idea to provide a system based on a timeout so that after a certain time without an input of the user the program will automatically close the admin menu and go back to the user interface.
Personally, I use 2 ways to manage the timeouts: the first way counts the time from the start of the operation, and closes it both if the user does or doesn’t interact with it, while the second one start counting the timeout after the last input, resetting the time everytime the user will interact with the interface. I’ll try to explain the differences between the two ways of working:
- 1st case: the admin has to insert a password within a certain time, let’s suppose 10 seconds (this is our timeout). The software will count 10 seconds, and whether or not the user has inserted it the code will terminate the operation. If the admin had inserted the password before the timeout, than he will be able to access the admin menu, otherwise the program will return to the normal interface.
- 2nd case: let’s suppose that it is required that the user interact with the program interface, i.e. the user can explore the items of a menu or has to insert something with the keyboard. In this case we have to give the user the time to input the required datas, so the program will count the timeout only when there is no user’s activity while it will reset the timeout as soon as something happens (i.e. the user pressed a button).
Let’s starting to examine the first case. To simplify the things, in this first test, we won’t use the connection with the PC so that our sketch will be simple and easy to read. So, keep a breadboard and make the following circuit: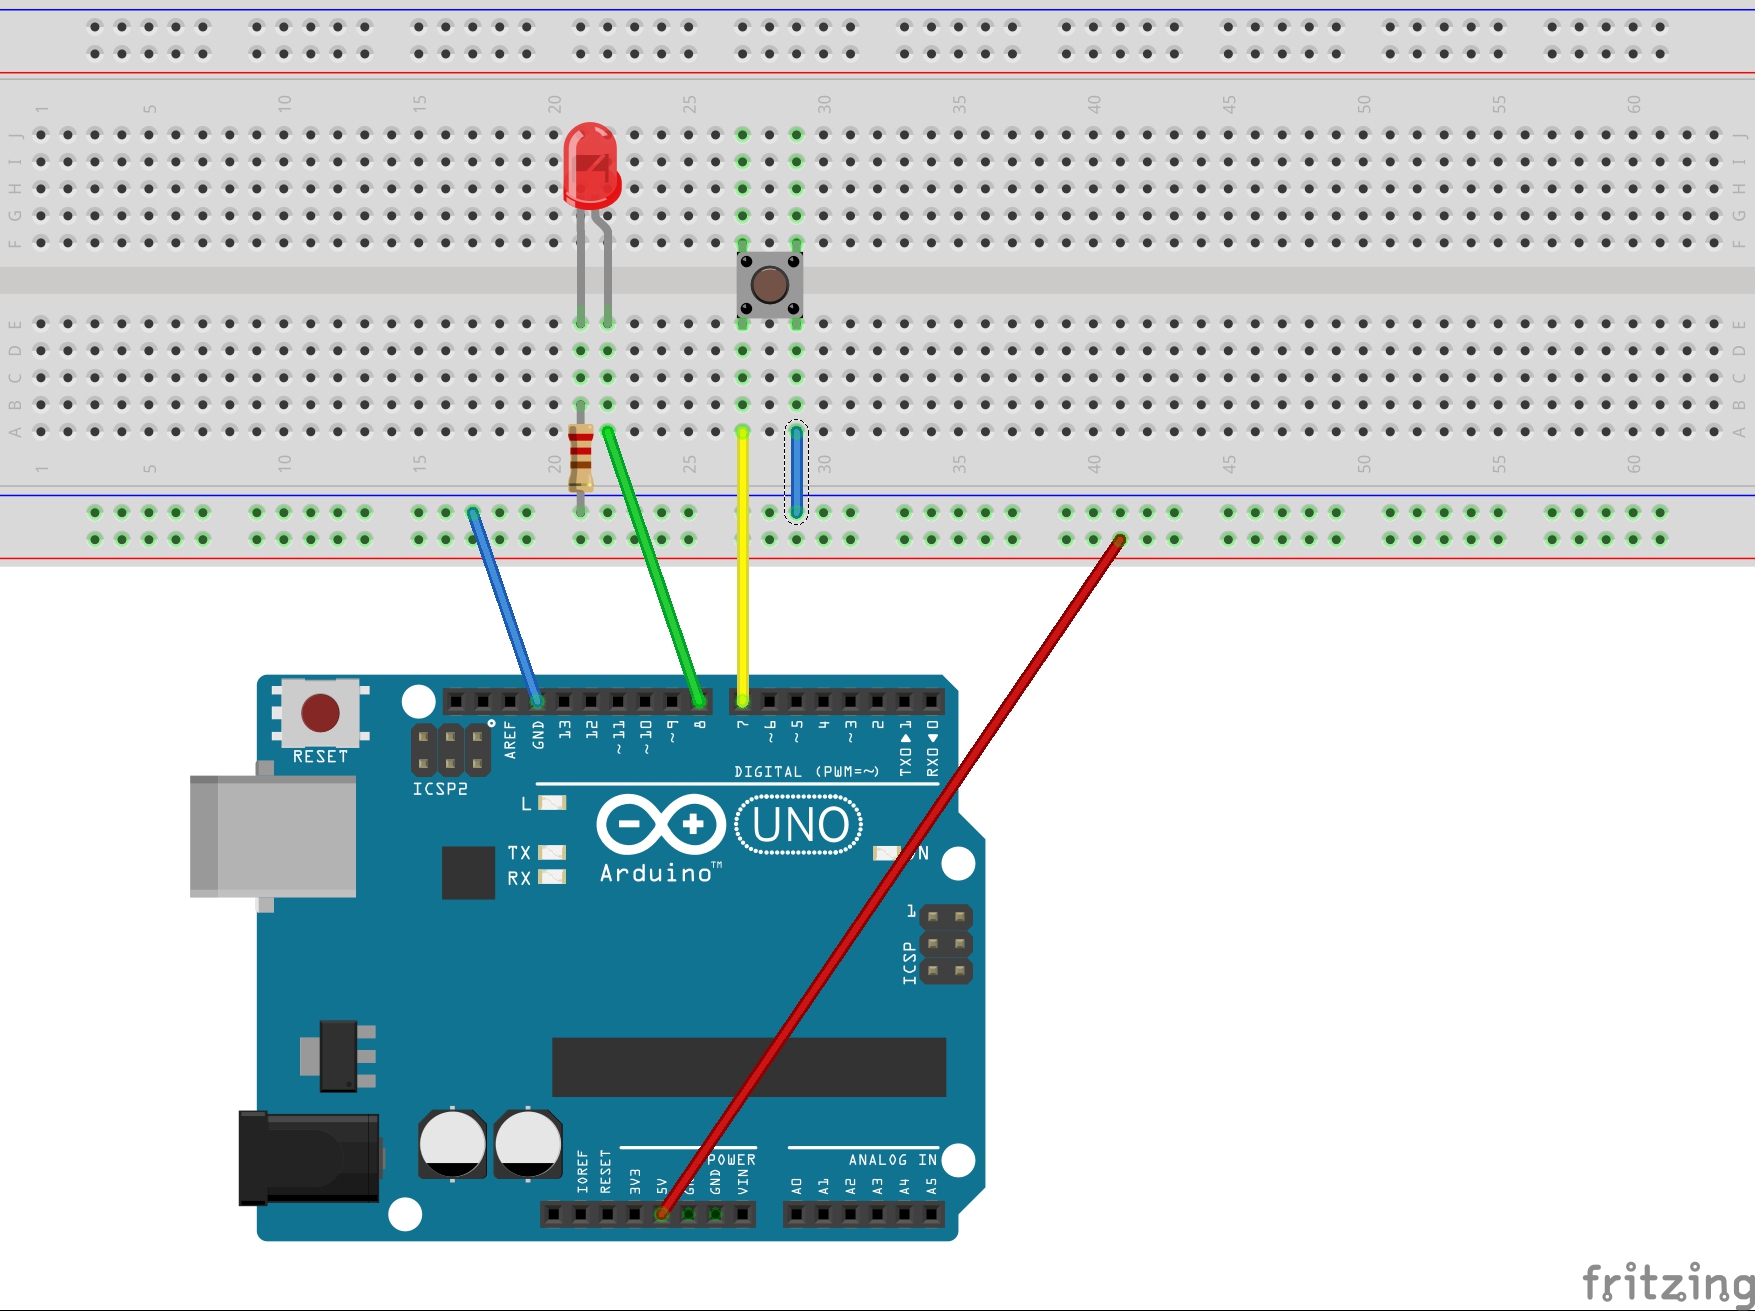 You’ll need: an Arduino board, a switch, a red LED, a 220 ohm resistor. Keep the LED and connect its cathode to ground through the resistor and its anode to pin 8. Then, connect a pin of the switch to ground and a pin of the other side (be careful, don’t connect two pins of the same side: you make a short circuit!) to pin 7 of Arduino. We won’t use a pull-up or pull-down resistor for the switch because we’ll use the internal pull-up of the pin. Now, the code to upload to the Arduino:
/* EXAMPLE OF A TIMEOUT TO EXIT AN INTERACTIVE
   SESSION BETWEEN USER AND ARDUINO

   This example is released under the Creative Commons
   License BY-NC-SA 4.0 ITA or newer

   Author: Leonardo Miliani
   Website for explanatory article and newer versions
   of this code: www.leonardomiliani.com

   Release: 20140811-1.0
*/


//pins declaration
const byte INPUT_BUTTON = 7;
const byte OUTPUT_LED = 8;

//global variables
const unsigned long timeout = 10000; //the timeout in milliseconds

//setup
void setup() {
    //pins configuration
    pinMode(OUTPUT_LED, OUTPUT); //LED pin as output
    pinMode(INPUT_BUTTON, INPUT_PULLUP); //button pin as input w/internal pull-up
}


//loop
void loop() {
    //has the user pressed the button?
    if (!digitalRead(INPUT_BUTTON)) {
        //wait for a while, to avoid bounces
        delay(30);
        if (!digitalRead(INPUT_BUTTON)) { //the button is still pressed, it wasn't a bounce
          interactWithUser();
        }
    }
}


//interaction with user
void interactWithUser() {
    unsigned long startingTime; //used to store the starting moment
    boolean pressed = false; //used to know if the user has pressed the button

    //wait for the release of the button
    while(!digitalRead(INPUT_BUTTON));

    digitalWrite(OUTPUT_LED, HIGH); //LED on
    //loop
    startingTime = millis();
    do {
        //has the user pressed the button?
        if (!digitalRead(INPUT_BUTTON)) {
            //debounce
            delay(30);
            if (!digitalRead(INPUT_BUTTON)) {
                //the user has pressed the button
                pressed = true;
                break;
            }
        }
    } while ((!pressed) && ((millis() - startingTime) < timeout));
    //this loop will only end when the user has pressed the button or it goes in timeout

    //check if hte user has pressed the button in time
    if (pressed) {
        //fast blinking for confirmation
        for (byte i = 0; i < 6; i++) {
            digitalWrite(OUTPUT_LED, HIGH);
            delay(50);
            digitalWrite(OUTPUT_LED, LOW);
            delay(50);
        }
    } else {
        //light off the LED
        digitalWrite(OUTPUT_LED, LOW);
    }
}
The heart of the code is the do..while loop of the function interactWithUser. To let the code works we need 2 variables: pressed, that is used to know if the button has been pressed, and startingTime, that contains the moment the control of the timeout started (the value of the timeout is predefined in a constant at the beginning of the code). Before the do..while loop we just set the status variable to false and store the current value of millis(). Inside the loop will repeatedly check if the user has pressed the button: in case he did it, we’ll set to true our status variable and then will immediately leave the loop using a break. The do..while will loop over and over again until the status variable is false (this means that the user didn’t press the button) and the timeout hasn’t been reached yet. The timeout is managed with the test at the end of the loop: “if the difference between the current value of millis and that one stored at the beginning of the loop is greater than timeout, then terminates the loop“. This is the simplest check: it waits for a condition to happen (that can be complex too, i.e. the user has to pass or insert a password through the serial port or with a keyboard) and leaves the loop when it occurs or when the granted time has expired.
The second case is a little bit different. Every time that the user pressed the button, the program has to reset the timer because the timeout only occurs after the user hasn’t interacted with our device for a certain time. The code is similar to the one used for the previous case, with a little difference: instead of an immediate exit, every time that we see a button press, we reset the time to 0.
/* EXAMPLE #2 OF A TIMEOUT TO EXIT AN INTERACTIVE
   SESSION BEtWEEN USER AND ARDUINO

   This example is released under the Creative Commons
   License BY-NC-SA 4.0 ITA or newer

   Author: Leonardo Miliani
   Website for explanatory article and newer versions
   of this code: www.leonardomiliani.com

   Release: 20140811-1.0
*/


//pins declaration
const byte INPUT_BUTTON = 7;
const byte OUTPUT_LED = 8;

//global variables
const unsigned long timeout = 10000; //the timeout in milliseconds

//setup
void setup() {
    //pins configuration
    pinMode(OUTPUT_LED, OUTPUT); //LED pin as output
    pinMode(INPUT_BUTTON, INPUT_PULLUP); //button pin as input w/internal pull-up
}


//loop
void loop() {
    //has the user pressed the button?
    if (!digitalRead(INPUT_BUTTON)) {
        //wait for a while, to avoid bounces
        delay(30);
        if (!digitalRead(INPUT_BUTTON)) { //the button is still pressed, it wasn't a bounce
          iteractWithUser();
        }
    }
}


//iteraction with user
void iteractWithUser() {
    unsigned long startingTime; //used to store the starting moment

    //wait for the release of the button
    while(!digitalRead(INPUT_BUTTON));

    digitalWrite(OUTPUT_LED, HIGH); //LED on
    //loop
    startingTime = millis();
    do {
        //has the user pressed the button?
        if (!digitalRead(INPUT_BUTTON)) {
            //debounce
            delay(30);
            if (!digitalRead(INPUT_BUTTON)) {
                //the user has pressed the button
                //fast blinking for confirmation
                digitalWrite(OUTPUT_LED, LOW);
                delay(100);
                digitalWrite(OUTPUT_LED, HIGH);
                delay(100);
                startingTime = millis(); //we reset the initial time
            }
        }
    } while ((millis() - startingTime) < timeout);
    //this loop will only end when the it goes in timeout

    //light off the LED
    digitalWrite(OUTPUT_LED, LOW);
}
As you can see, every time the user presses the button the code makes a fast blink of the LED and store again the current value of millis, so that the code will leave the do..while loop only after the timeout has been reached since the last intercation.
Obviously these are demo codes: it will be the reader to adapt them to his own need, to manage case more complex.