
Once I chose the CPU and checked that it was OK, I started thinking about my next step. Having a functional computer isn’t so difficult. What is a computer built for? It’s basically a machine designed to execute commands, the software programs. When you load up any software in your computer you are giving the CPU a list of “instructions” to be executed to obtain some kind of result. It’s an easy task, with a modern computer: you power up your machine, wait for the OS to be loaded, then insert some kind of mass media device and run your software. But here we have just a simple CPU on a breadboard, at the moment! Without any kind of program nor any system to store the software in. We surely need a place where to store this software, we need some memory.
Usually a modern computer is made of RAM, a lot of RAM. The RAM is a particular kind of memory that is volatile. This means that once you turn off your computer it immediately loses whatever data that was stored in it. This is not a big problem because every time we power up the computer it will load again the operating system, usually from a hard disk. But a lot of time ago computers didn’t have a hard disk, but they had a NON-volatile memory where the manufacturer had stored the built-in software that was loaded at the start-up. This memory was usually a ROM, a Read-Only Memory: a memory that could only be read, writing on it was impossible. Or, better to say, writing was impossible after the initial programming. The ROM could be programmed only once, by the manufacturer of the computer through a silicon plant because the information was stored at an harrdware level. Another kind of non-rewritable memory was PROM, that stands for Programmable ROM. This memory could be programmed in a laboratory, with cheaper instruments but, like the ROM, once it was programmed it could be never rewritten. We could not use a ROM because we don’t have a silicon plant to do this job. We could not use a PROM, too: too expensive for an hobbyist. So EPROMs (Erasable PROM) were invented: a particular kind of PROM that could be programmed several times. The limit of this memories is that they need an UV (Ultra-violet) eraser, a device with an UV lamp where to put the chip for 30/40 minutes to reset the memory cells of the chip so that it can be programmed another time. To avoid big wastes of time, engineers developed EEPROMs, or Electrically Erasable PROM. This memories have a built-in circuit that uses simple electric pulses to reset the single memory cells, so that the writing/erasing/rewriting cycles are faster than using EPROMs. You can find old EEPROMs from eBay or buy something new. I got 2 chips: a second-hand X28C256, and a newer AT28C256 (I will use the latter). They are both 32K (256Kbit, 32Kx8): you can choose other sizes, but I suggest not to choose a chip under 8K.
To program an EEPROM we could use a specific EEPROM programmer but, since we are “nerd inside”, we will build an hobbist programmer based on an Arduino, a very popular prototyping board and just a bunch of additional components. Once we will have our EEPROM filled in with our code we will be able to start making some connections and try to execute some simple task. At the moment our priority is write such code into the EEPROM. Ad I said previously, we will use an Arduino board to do this job: an Arduino UNO perfectly fits this job. There are a lot of circuits and codes over the internet: after trying many of those, I personally opted for the TommyPROM programmer, one of the best ones. I could have written my own code but TommyPROM is ready-to-go, and it can also be used as an interface to send big files to the EEPROM through a terminal software. However, I modified the project because TommyPROM used 74LS164 serial to parallel shift registers that I didn’t have in my leftovers bin. Instead, I had several 74HC595 that fit well, too. Just some changes in the code and the circuit and we are ready to start. I have created a Github repository where you can find my mod. To keep the project simple, we’ll assemble our circuit on a common breadboard. Here is the list of the required material:
- 1x Arduino board (a UNO or a Nano are OK)
- 1x breadboard
- 2x 74HC595 shift registers
- 3x 0.1uF ceramic capacitors
- 3x 10Kohm resistors
- 1x 10uF polarized capacitor
- 1x 330ohm resistor
- 1x LED (any color)
- a lot of jumpers for the wiring
It’s important to place the 0.1uF ceramic capacitors as close as possible to the corresponding chips because they are needed to decouple them from the rest of the circuit’s power line. Instead, the polarized capacitor can be placed anywhere on the power lines of the breadboard: it will act as an energy reserve, useful to avoid power fluctuations caused by the chips operating. I also added a LED just to have a quick feedback as to whetever or not the circuit is under power. This is the schematics of our circuit:
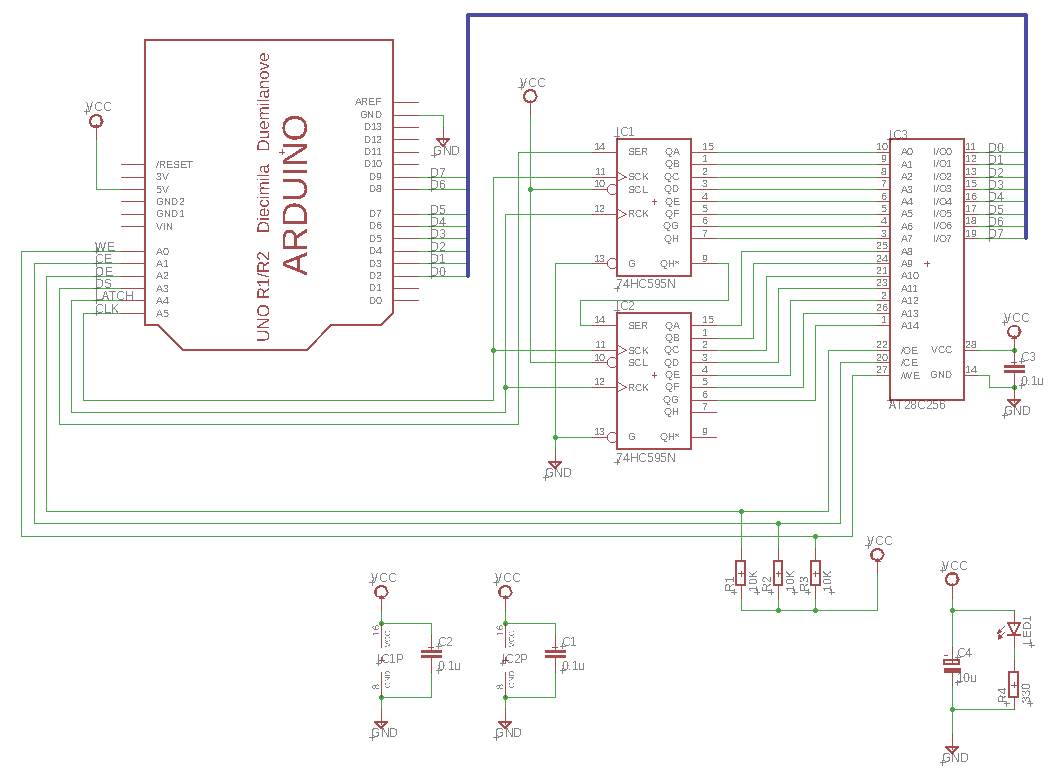
EEPROM programmer with Arduino UNO
And this is a picture of my programmer:
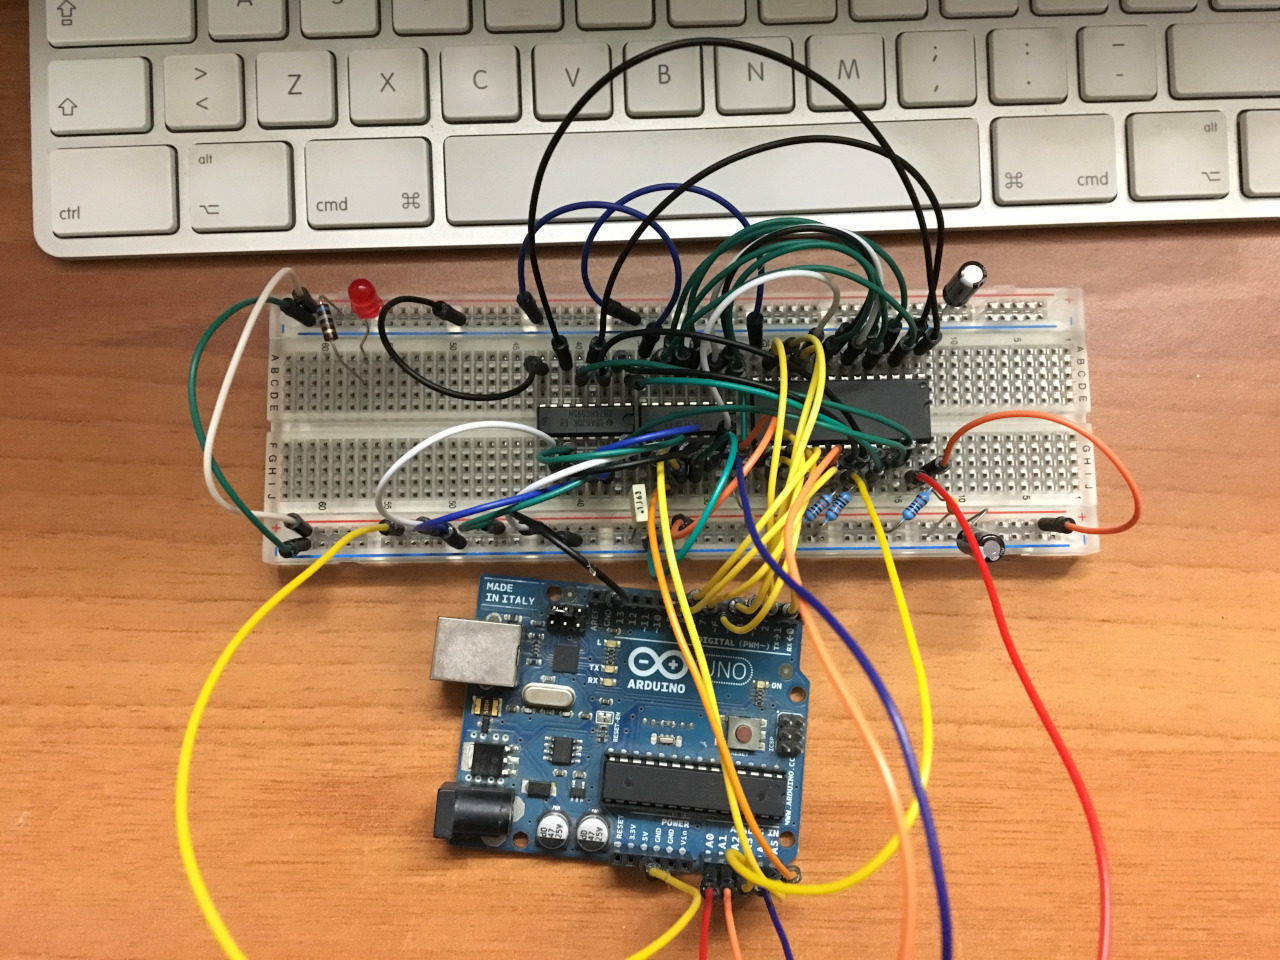
EEPROM programmer on breadboard
Take care to connect the output pins of the shift registers with the corresponding input pins of the EEPROM chip. Don’t forget to double check the data lines between the EEPROM chip and the Arduino pins. The programmer doesn’t sink too much current so it can be powered directly by the Arduino board, keep in mind to join the GNDs. Once you connected everything, load the sketch on the Arduino board and open a terminal to dialogue with the software. You can use the Arduino IDE terminal: for a dump or for filling up bunch of bytes the Arduino IDE serial terminal is enough but, as it doesn’t support the XMODEM protocol, it can not be able to read/write from/to a file. To do this you have to use a more complex terminal, like TeraTerm (Windows), Minicom (Linux), or CoolTerm (Mac). By having a Mac, I chose CoolTerm. Open up a connection at 115,200 bps, 8N1 (8 bits of data, No parity, 1 bit stop).
Once we checked that we can read/write on our EEPROM, we are ready to make a further step, to set up a very minimal computer with CPU, RAM, EEPROM, a clock, a reset circuit, and some peripherals to drive.
EDIT:
I have to make un update about the terminal emulator because I faced severe problems trying to upload the ROM file. To be short, I only found a couple of softwares that did their job using the TommyPROM sketch: these are Serial for Mac and TeraTerm for Windows. I tried a lot of terminal emulator without GUI (like screen and many Linux terminals) but none worked. I don’t know why and, sincerely, I didn’y want to study and rewrite the sketch of TommyPROM so I made a choise. By having a Mac, I first chose Seria but it’s a commercial software: I didn’t choose it. Let me explain, I discared it not just because it’s a paid software but because it’s too expensive for my pocket. So I created a virtual machine with VirtualBox, installed Windows 7 and opted for TeraTerm. It’s a free solution and… it works! I compile on Mac, share the ROM file with the Windows machine and upload through the Arduino by using TeraTerm.


Thank you for the excellent write-up Leonardo, this was super interesting, and I am in the process of doing something similar. I have to agree with you on the frustrations with using a Mac and finding a terminal emulator that actually works. I was hitting my head against a wall trying to figure out why I couldn’t download/upload binary files (Screen, Minicom, etc.), only to find out it worked straight away through a virtualized environment running Windows and TeraTerm. I have to figure that it’s the CH340 serial driver that is unable to properly handle things, but life is too short to debug everything that comes your way 🙂